How to build an image host using AWS Lambda, S3, and Dynamo
AWS Lambda is a big deal; it allows people to write reliable web services quickly and easily. In this post, we’re going to be exploring how to build a very simple image hosting service with Lambda, S3, and Dynamo.
Design
There are only two operations we’d like users to be able to perform:
- Upload an image to a gallery
- View all images in a gallery
For the sake of simplicity, we won’t care about authentication, permissions, style, potential of abuse, or anything else besides the two things above. Even though our solution will be very simple, it will be very inexpensive, scalable, and extensible, and will demonstrate the use of S3, Dynamo, and Lambda.1
Architecture
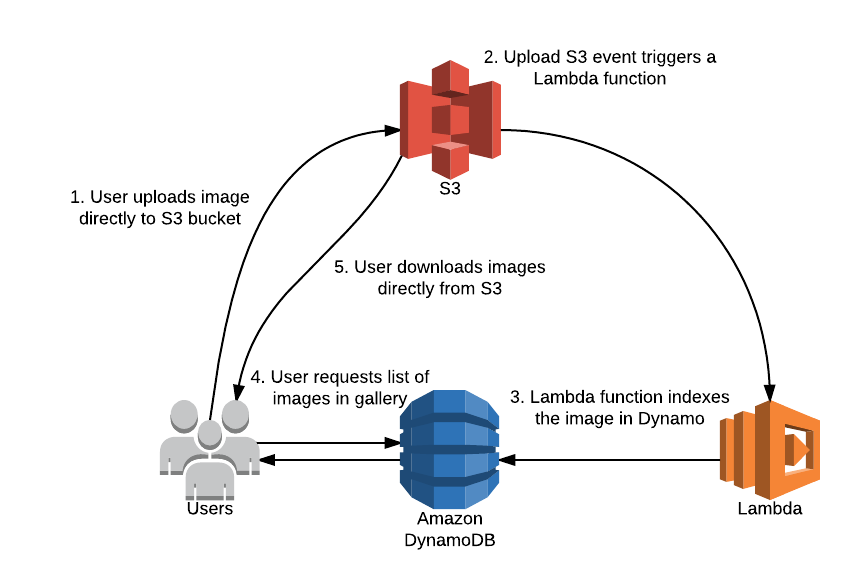
For image storage and retrieval, we’ll use S3. To keep track of which images have been uploaded to which galleries, we are going to build an index of the images in S3 using Lambda. Instead of maintaining a server, we’re going to have users run the AWS SDK in their browser to access S3 and Dynamo.
Implementation
Storing the images
The first matter of business is to create and configure the S3 bucket.
Creating the S3 bucket
Create an S3 bucket with any name you like (I used service-image-storage) and any region that you’d like (I used Oregon/us-west-2.)
Configuring Cross-Origin Resource Sharing (CORS)
Web browsers have security features that restrict requests to different domains (like S3) to prevent cross-site scripting attacks. Cross-origin resource sharing allows these types of requests to take place. In order to allow communication between S3 and our image upload page, we need to configure CORS.
To configure the permissions, go into the bucket properties in the S3 interface, and then under the permissions tab click “Add CORS Configuration”.
Then, copy in this CORS configuration, replace the AllowedOrigin with your domain, and hit save! You can use the wildcard * for the domain, but this is a security risk.
<CORSConfiguration>
    <CORSRule>
        <AllowedOrigin>your.domain</AllowedOrigin>
        <AllowedMethod>GET</AllowedMethod>
        <AllowedMethod>PUT</AllowedMethod>
        <AllowedHeader>*</AllowedHeader>
        <ExposeHeader>ETag</ExposeHeader>
    </CORSRule>
</CORSConfiguration>
Creating an IAM user
In a real web service, you would want to use Amazon Cognito or Web Identity Federation for authentication. However, for the sake of simplicity, we’ll hardcode credentials into our app and limit their scope.
Go to IAM and create a new user. Add an inline policy to limit scope to only the required operations (getting and putting objects, putting the ACL, aborting multi-part uploads, and fetching the CORS configuration.)
{
    "Version": "2012-10-17",
    "Statement": [
        {
            "Sid": "Stmt1459648333000",
            "Effect": "Allow",
            "Action": [
                "s3:AbortMultipartUpload",
                "s3:GetBucketCORS",
                "s3:GetObject",
                "s3:PutObject",
                "s3:PutObjectAcl"
            ],
            "Resource": [
                "arn:aws:s3:::service-image-storage/*",
                "arn:aws:s3:::service-image-storage"
            ]
        }
    ]
}
Building the upload page
Now we need to build a way for users to upload images. I’m going to explain the implementation in chunks; if you’d like to see the finished product, you can find that here.
Create an HTML file. In the head section, import the AWS SDK, and configure it.
<script src="https://sdk.amazonaws.com/js/aws-sdk-2.3.0.min.js"></script>
<script>
AWS.config.update({
  accessKeyId: 'your-access-key',
  secretAccessKey: 'your-secret-access-key',
  region: 'your-region'
});

var S3 = new AWS.S3({params: {Bucket: 'your-bucket-name'}});
var Dynamo = new AWS.DynamoDB.DocumentClient({region: 'your-region'});
</script>
Next, let’s create a little section in the body that consists of the elements that the user will interact with.
Image: <input type="file" id="file-chooser" />
<br>
Gallery: <input type="text" id="gallery-name" />
<br>

<button id="upload-button">Upload Image</button>
<button id="list-images">List images in gallery </button>

<ul id="image-list" />
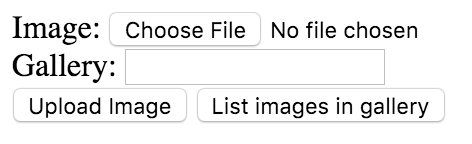
This renders to the incredibly beautiful layout below. There is a file picker, a text box to specify the gallery, a button that will trigger an image upload, and a button to list the images in the gallery.
Now that we’ve written the HTML necessary, we can start wiring up the Javascript. First, let’s write the code necessary to upload files (sorry for the copious alerts, I’m lazy 😛)
// Fetch the gallery name from the gallery input
function getGalleryName() {
  return document.getElementById('gallery-name').value;
}

// Grab a reference to the upload button
let uploadButton = document.getElementById('upload-button');

// Make the button respond to clicks
uploadButton.addEventListener('click', function() {
  let fileChooser = document.getElementById('file-chooser');
  let file = fileChooser.files[0];

  // Check that the user has specified a file to upload
  if (!file) {
    alert("You must choose a file to upload!");
    return;
  }

  // Check the MIME type is an image
  if (file.type.indexOf("image") == -1) {
    alert("You may only upload images");
    return;
  }

  // Get the gallery name and check that it isn't empty
  let galleryName = getGalleryName();
  if (!galleryName) {
    alert("You need to enter a gallery name");
    return;
  }

  // Specify the S3 upload parameters
  let params = {
    Key: galleryName + '/' + file.name,
    ContentType: file.type,
    Body: file,
    ACL: 'public-read'
  };

  // Upload the file
  S3.upload(params, function(err, data) {
    if (err) {
      alert(err);
    } else {
      alert("Image uploaded successfully!");
    }
  });
});
At this point, you should be able to upload images and see them appear in S3!
Indexing the images
Now that we have a way for users to upload images, let’s create the indexing system.
Create a Dynamo table
We’re going to use Dynamo to store the file index because it’s fast, cheap, scalable, and easy to use.
Create a table with whatever table name you like (I used images-index.)
I’ve learned that Dynamo is one of the easiest and most scalable databases, as long as you keep a few things in mind:
- Dynamo is not magic. Know the best practices. Know the partitioning behavior.
- Know exactly what operations you are going to perform on the data.
- Avoid the hot shard issue. Each partition only supports 3000 units of reads per second and 1000 units of writes per second. Eventually-consistent reads of hot items can be easily mitigated with caching, but writes are a bit more difficult to deal with. If you are planning to have a particularly concentrated access pattern, you may want to reconsider your design.
For the table, we need to specify the primary key. In this case, the only operation we’d like to perform on the table is to discover what images are in a gallery. Therefore, we’ll use a composite primary key, with the partition key being gallery (the gallery name), and the range key being file_path (the image S3 key.)
Once you’ve specified these settings, create the table.
Permission the IAM user to query the Dynamo table
Now that we have a Dynamo table we’ll use to store our index, we have to permission our IAM user to query the table.
Go back into IAM and create another inline policy to enable this.
{
    "Version": "2012-10-17",
    "Statement": [
        {
            "Sid": "Stmt1459639595000",
            "Effect": "Allow",
            "Action": [
                "dynamodb:Query"
            ],
            "Resource": [
                "arn:aws:dynamodb:us-west-2:206837638551:table/your-table-name"
            ]
        }
    ]
}
Create the index Lambda function
Now that we have a Dynamo table to store the image index, we now need to write code to maintain the index. We’ll write a function that will run when S3 objects are created.
Go to Lambda, create a new function, and configure the event source to be S3 on the event “Object Created(All)” with the bucket name matching the one you created earlier.
Name your function (I used image-index.) Keep the runtime as Node.js.
Replace the function with the one below (make sure to replace the table name corresponding to the one you created before.)
var AWS = require('aws-sdk');
var dynamo = new AWS.DynamoDB.DocumentClient({region: 'us-west-2'});

exports.handler = function(event, context) {
    var file_path = decodeURIComponent(event.Records[0].s3.object.key.replace(/\+/g, ' '));
    var gallery = file_path.split("/")[0];

    var params = {
        TableName: 'your-table-name',
        Item: {
            gallery: gallery,
            file_path: file_path
        }
    };

    dynamo.put(params, context.done);
};
For the Lambda function role, create a new role of type “Basic DynamoDB” (you may want to go into IAM and restrict the permissions to putting items into the Dynamo table you created.)
Keep the rest of the settings the same. Enable the event source now.
We now have a function that will index our S3 images whenever they are uploaded!
Providing a way to list the images in the gallery
Now that we have the index, the only thing left is to provide some method of listing images in the gallery.
// Get a reference to the button to list images
let listImagesButton = document.getElementById('list-images');

// Upon click, fetch the index from Dynamo and use that to
// fetch images in the specified gallery
listImagesButton.addEventListener('click', function() {
  let galleryName = getGalleryName();
  if (!galleryName) {
    alert("Must enter a gallery name to list the images!");
    return;
  }

  // Disable the list button so you can't perform multiple fetches at once
  listImagesButton.disabled = true;
  // Dispose of any images from previous fetches
  emptyImageList();

  // Fetch all images in the gallery, then re-enable the list button.
  listImagesInGallery(galleryName, function(err) {
    if (err) {
      alert("Dynamo error: " + err);
    }
    listImagesButton.disabled = false;
  });
})

// Fetch all images in the given gallery.
// `startKey` represents the exclusive start key of the Dynamo query.
// To start a new query, leave `startKey` undefined.
// This function recursively calls itself until there are no more query pages,
// and then runs the callback.
function listImagesInGallery(galleryName, cb, startKey) {
  let params = {
    TableName: 'index-table-name',
    ProjectionExpression: 'file_path',
    KeyConditionExpression: 'gallery = :galleryname',
    ExpressionAttributeValues: {
      ":galleryname": galleryName
    },
    ExclusiveStartKey: startKey,
  }

  Dynamo.query(params, function (err, data) {
    if (err) {
      return cb(err);
    }

    for (item of data.Items) {
      appendImageToList(item.file_path);
    }

    if (data.LastEvaluatedKey) { // there are more pages to fetch
      // Soon ECMA6 will have tail call optimization :D
      return listImagesInGallery(galleryName, cb, data.LastEvaluatedKey);
    } else {
      return cb(null);
    }
  })
}

// Add an image to the end of the image list
function appendImageToList(imagePath) {
  let ul = document.getElementById('image-list');
  let li = document.createElement('li');
  let img = document.createElement('img');

  img.src = 'https://s3-your-bucket-region.amazonaws.com/your-bucket-name/' + imagePath
  img.style.maxWidth = "200px";

  li.appendChild(img);
  ul.appendChild(li);
}

// Remove all images from the image list
function emptyImageList() {
  document.getElementById('image-list').innerHTML = '';
}
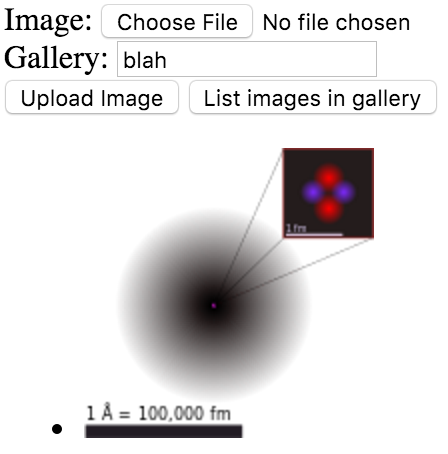
Now, if you enter the name of a gallery you have uploaded images to and hit “List images in gallery”, all of the images should appear!
Issues and extensions
Even though we now have a functional image host, there are some pretty serious issues and a lot of room for improvement (despite the world-class JavaScript 😛)
- We have created an unrestricted and unlimited file host. There is nothing stopping users from writing an alternative client and abusing the service. We can prevent this somewhat by using authentication (see above), API Gateway, and pre-signed URLs. Alternatively, we could run our own servers or use a different solution to implement rate limits and abuse prevention.
- Images can be overwritten. By using a versioned S3 bucket, we could allow multiple versions of an image to exist. We could also use the approaches discussed above and check for object existence before generating a pre-signed URL.
- The JavaScript that I have written is not portable (not many browsers support the
letkeyword.) - If a certain gallery was really popular, we’d run into the hot shard issue. We can mitigate this by introducing a caching layer for galleries (perhaps using ElastiCache.)
- The interface we’ve created is going to win so many design awards we won’t know what to do with them (though we might as well refactor with React and Flux).
- If request rates on S3 get really high, we might have some scaling issues. These issues can be fixed by throwing money at the problem and paying for CloudFront.
We also could implement features like image titles, captions, user accounts, analytics, etc., though I’ll leave those as an exercise to the reader.
-
If you are familiar with S3, you might know that you can do all of this without Dynamo and Lambda. However, for the sake of teaching and extensibility I’m going to cover them anyways! ↩︎